Blood sensory bin

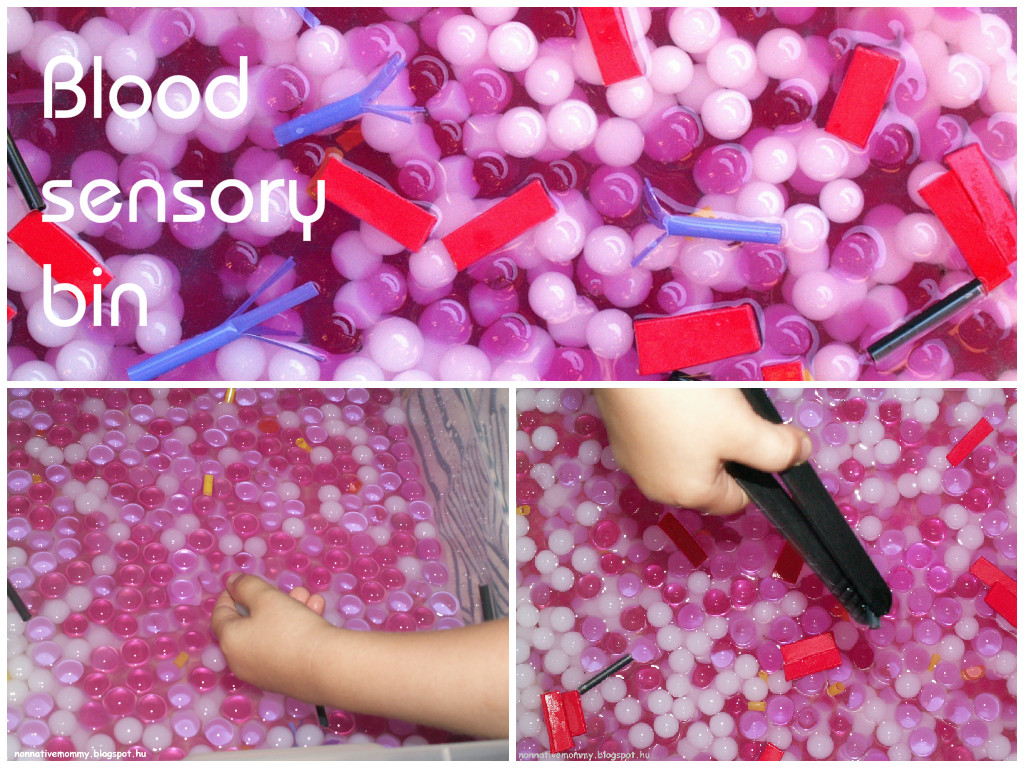
E.’s new focus is on the human body, more precisely on BLOOD. She loves talking about it, seeing it, reading about it and experiencing it. That’s why the sensory bin idea has come up.

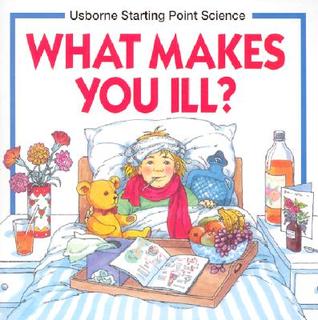
She started to be interested in blood when she first saw some blood vessels in the Usborne book titled: What makes you ill?

This book is about a lot of other things and not only blood: symptoms, germ types, allergies, cuts, lumps and bruises as well as a healthy lifestyle.

She’s been asking so many questions about our blood: Why is blood red? When does it come out of our body? What do white blood cells do? What are germs?

I remembered seeing a great activity on blood and after having searched for it for days I didn’t manage to find so I had to do with what I remembered.

What you need:

  1.  a big bin (IKEA)
  2. water (about 1 litre)
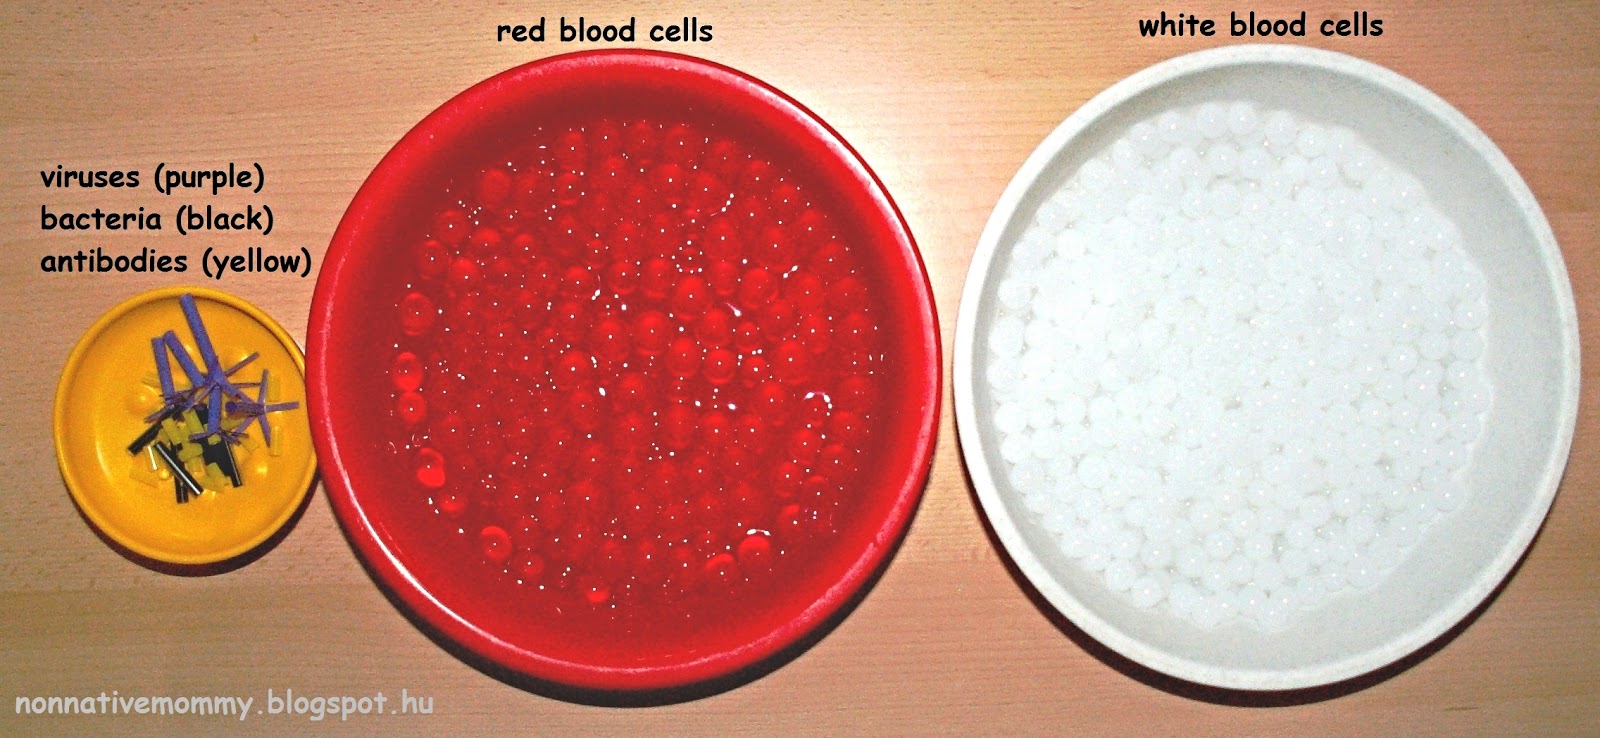
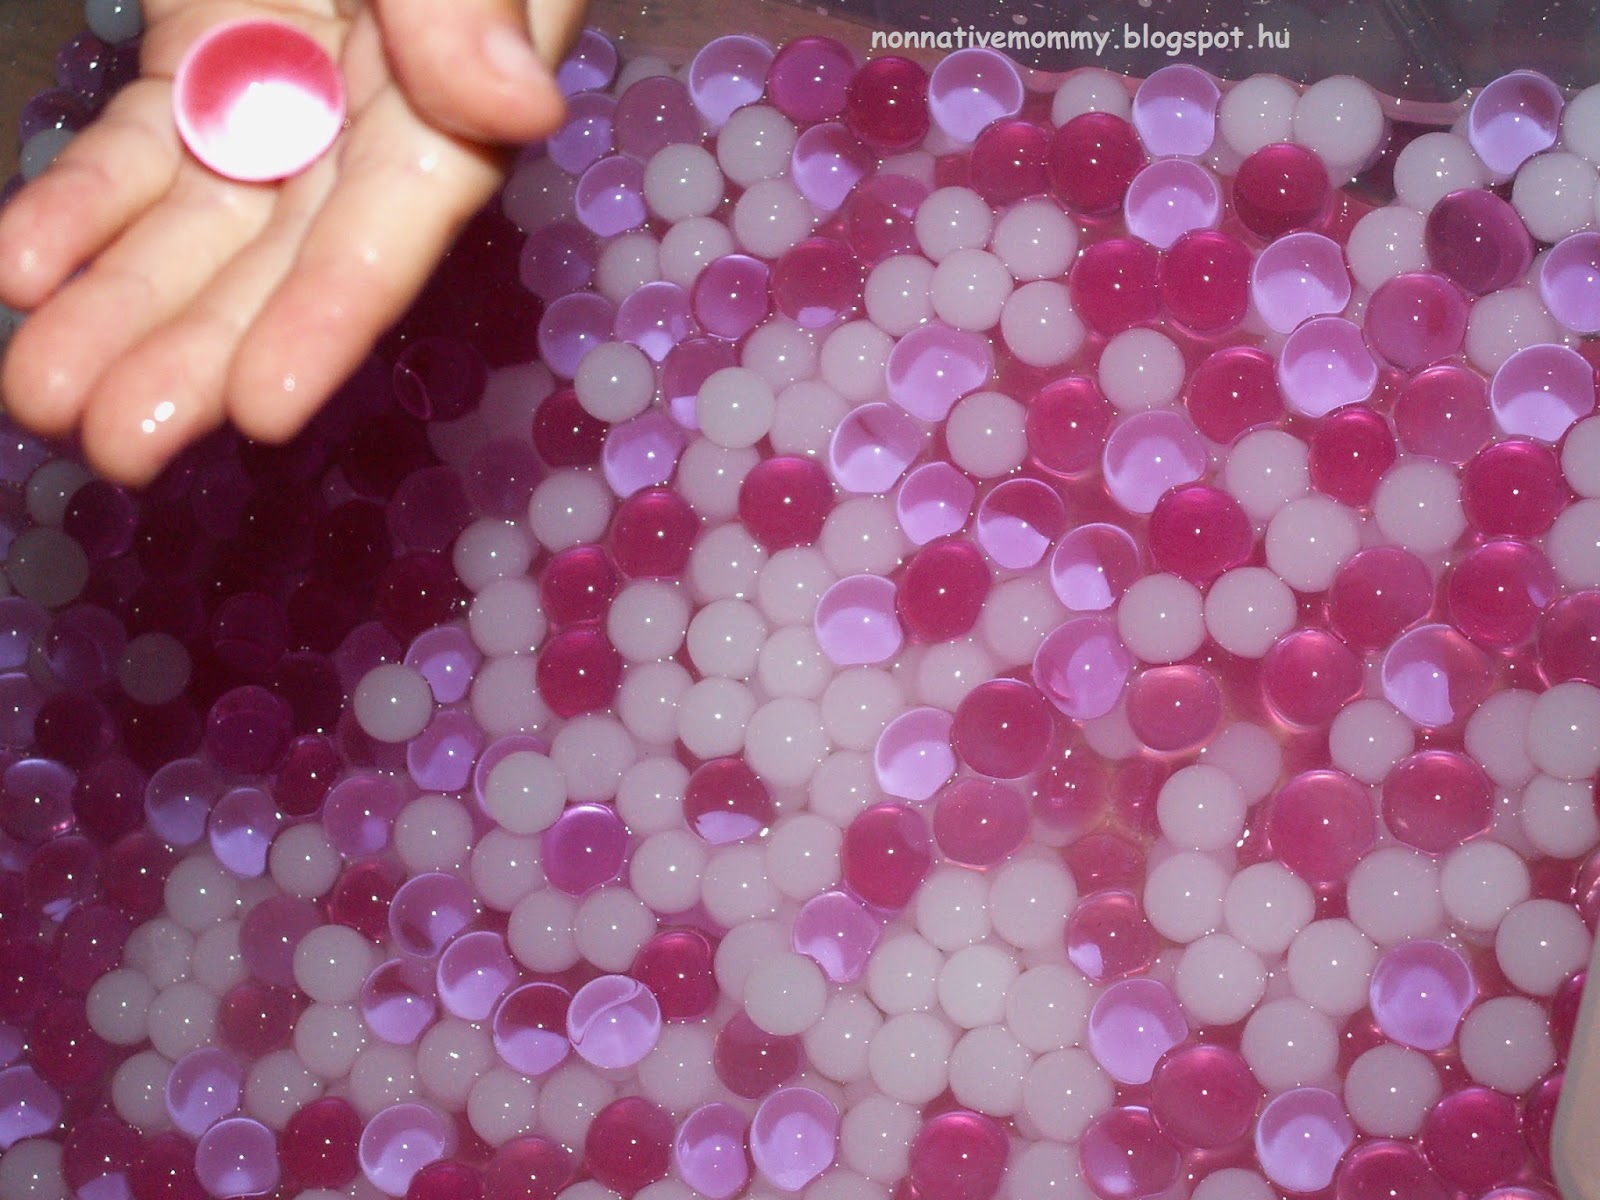
  3. water beads (red and white – you can buy them at the florist’s or order them online)
  4. plastic straws (of 3 different colours. I used purple, black and yellow)
  5. red foam sheet
What to do:

  1. Put the red and white water beads in two bowls and add half a litre of water each. Let them soak for 5-6 hours or overnight

  2. Cut up the straws into different shapes

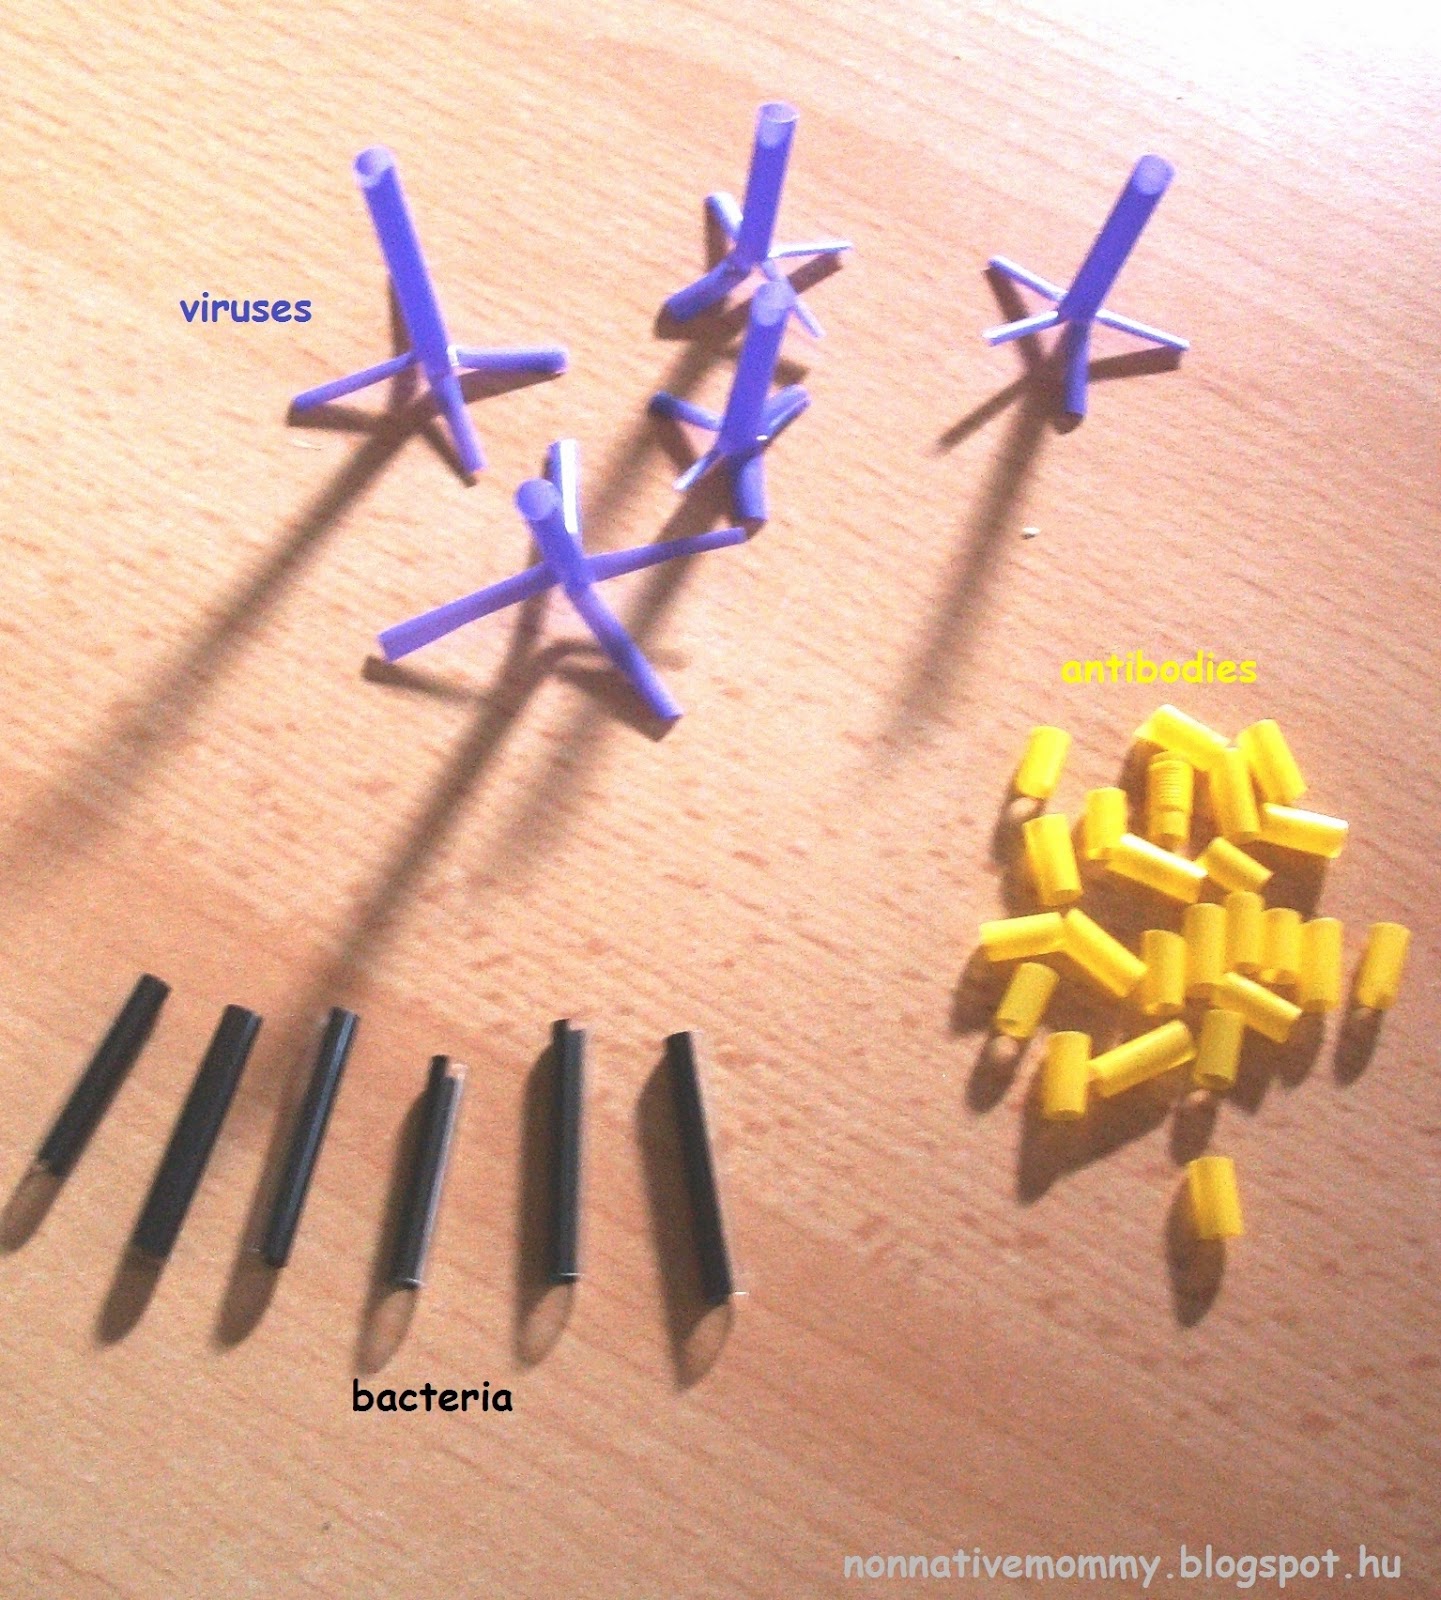
    Antibodies (yellow straw pieces) help to kill germs (viruses and bacteria). They are the memory of the immune system.

    Viruses and bacteria (purple and black straw pieces) are tiny germs attacking your body and making you ill.

  3. Cut out rectangle shaped platelets (at first I forgot to make these, nevertheless, E. has been playing with this sensory bin for more than a week now so I had time to add them)

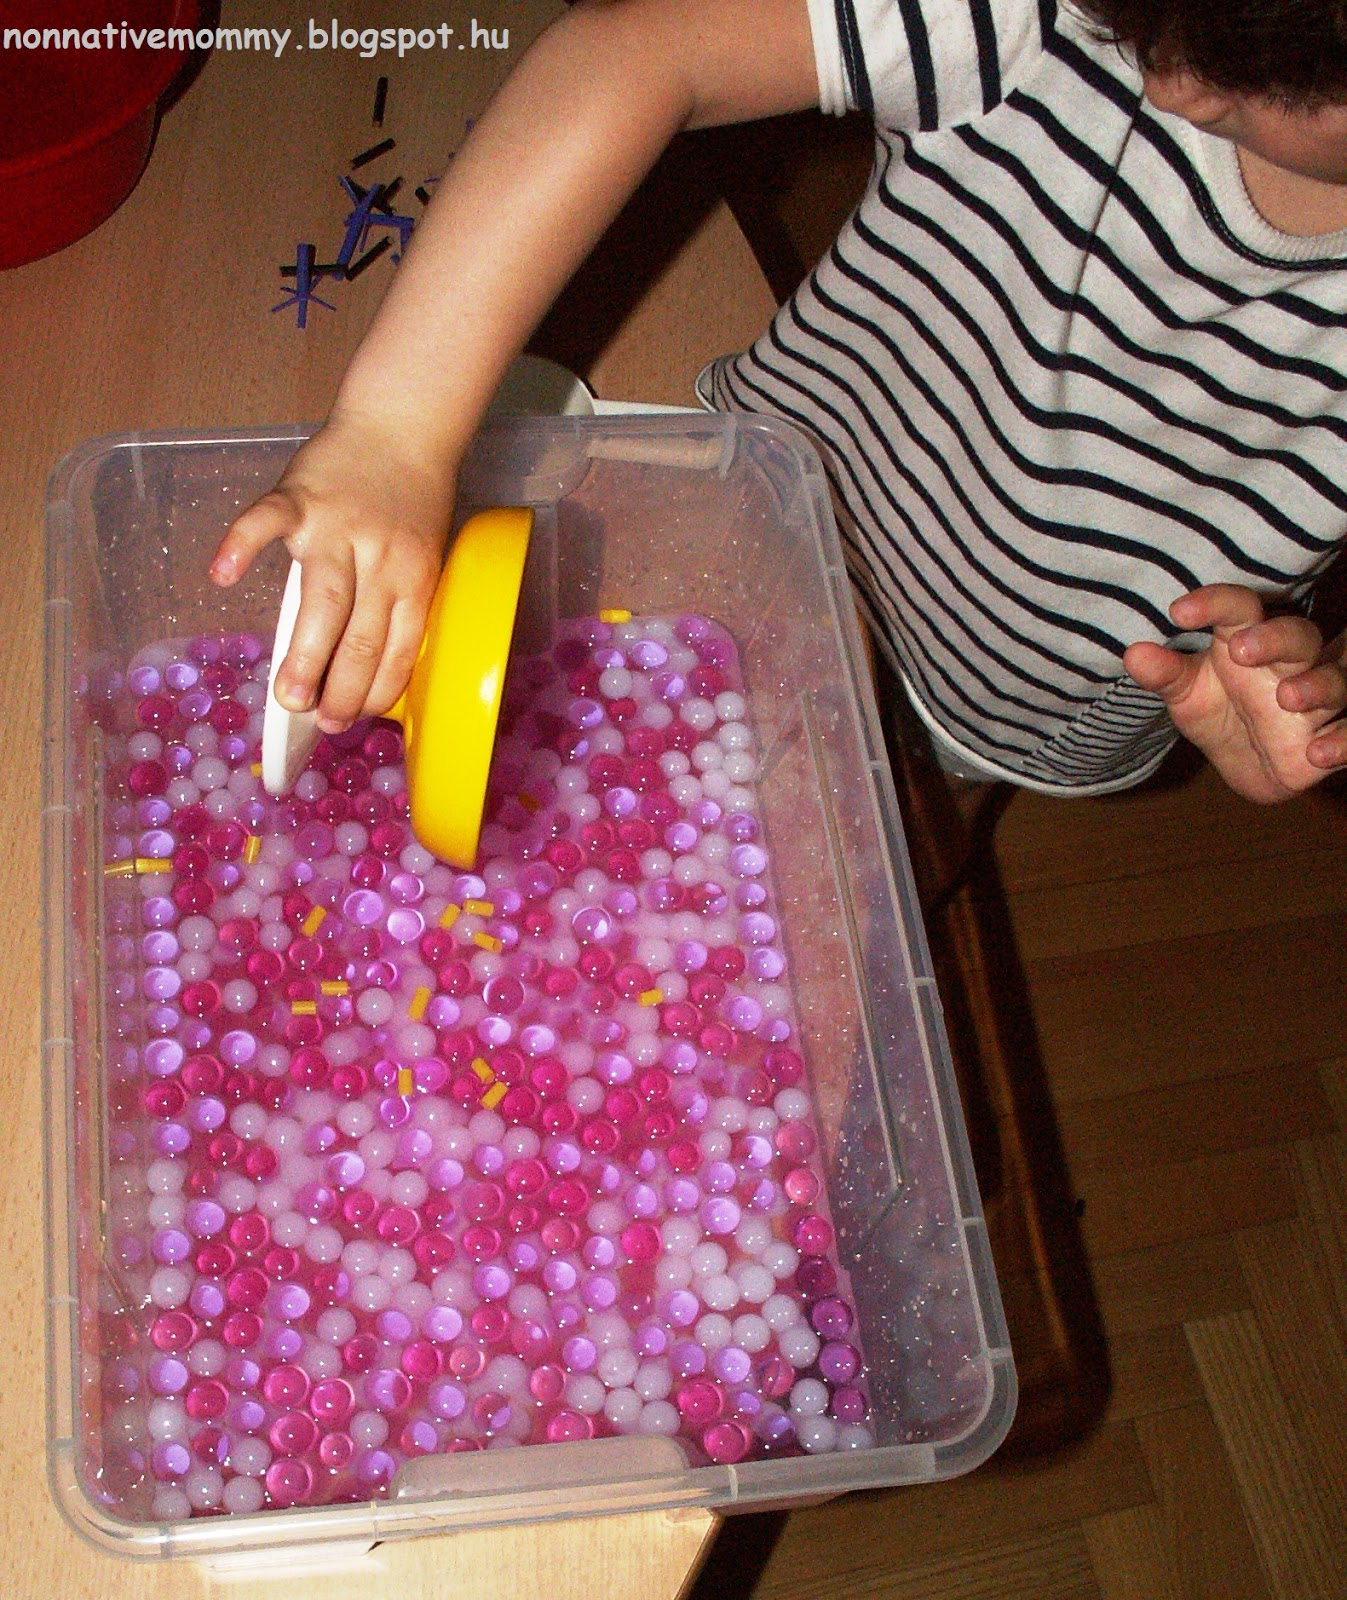
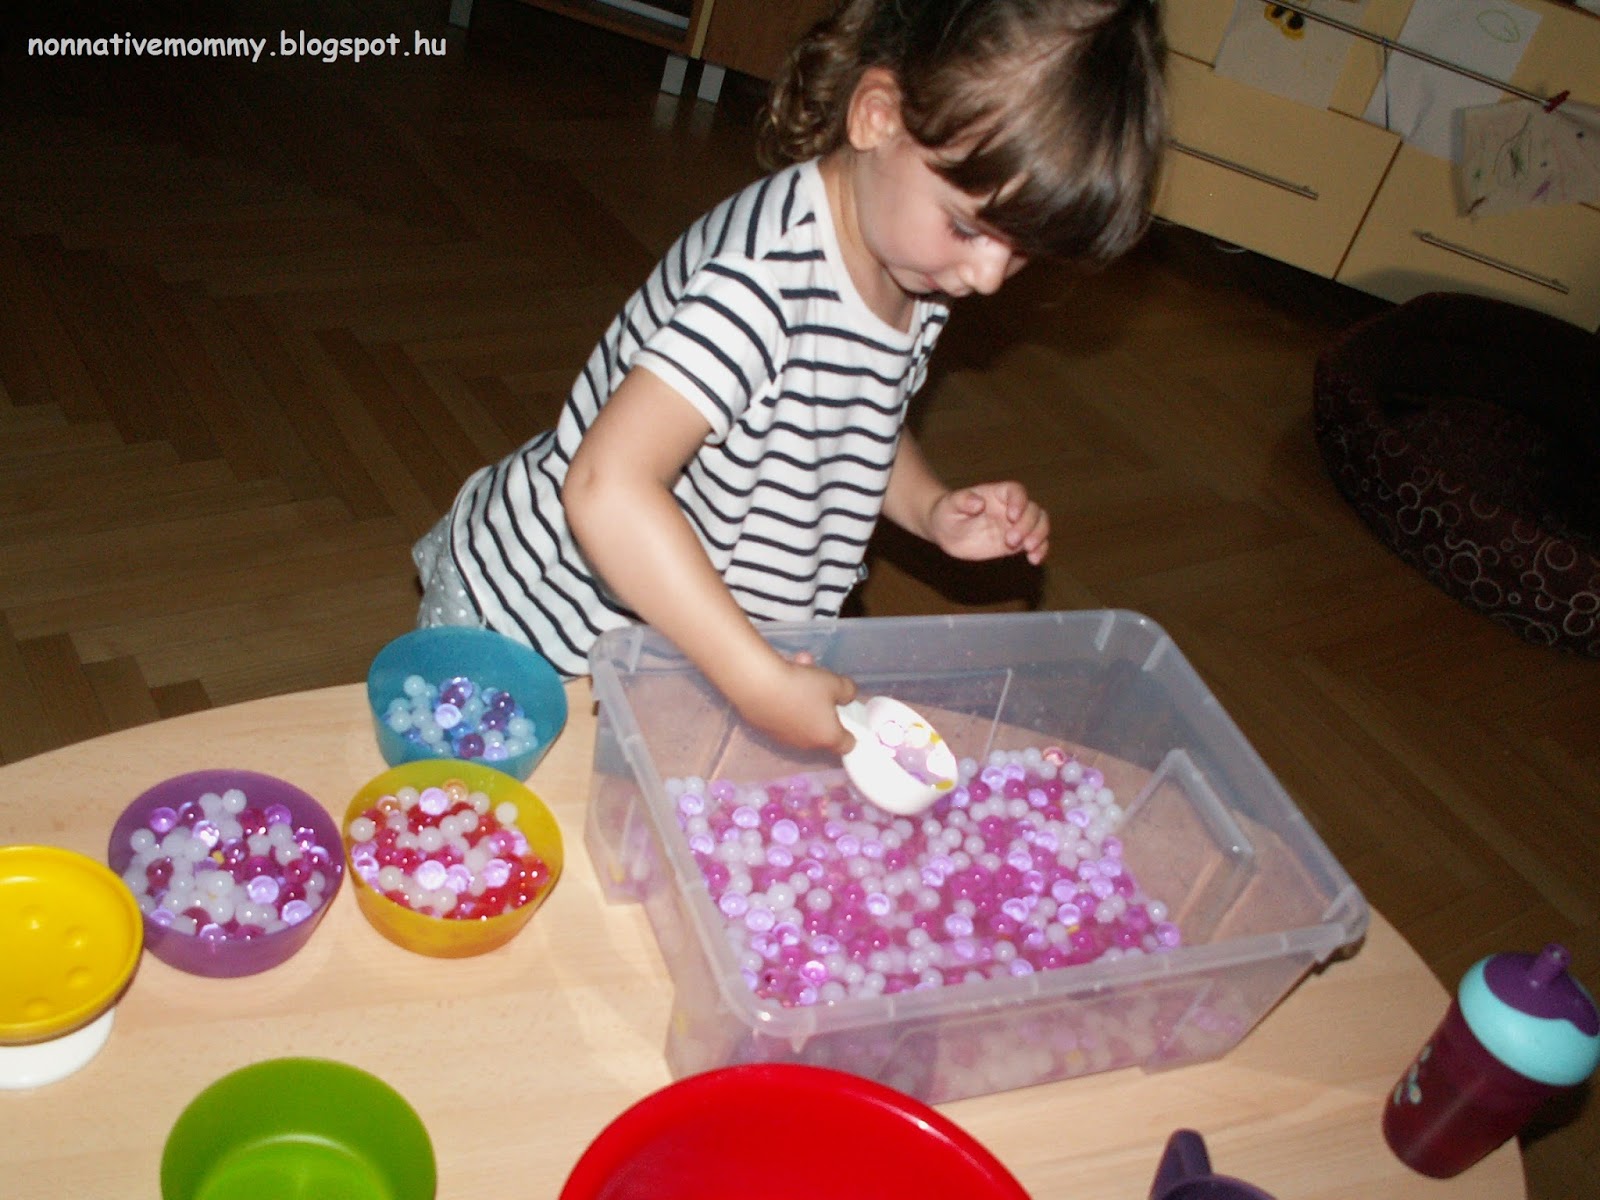
  4. Prepare the beads, the straws and foam rectangles, some measuring spoons or ladles, a let your child explore it.
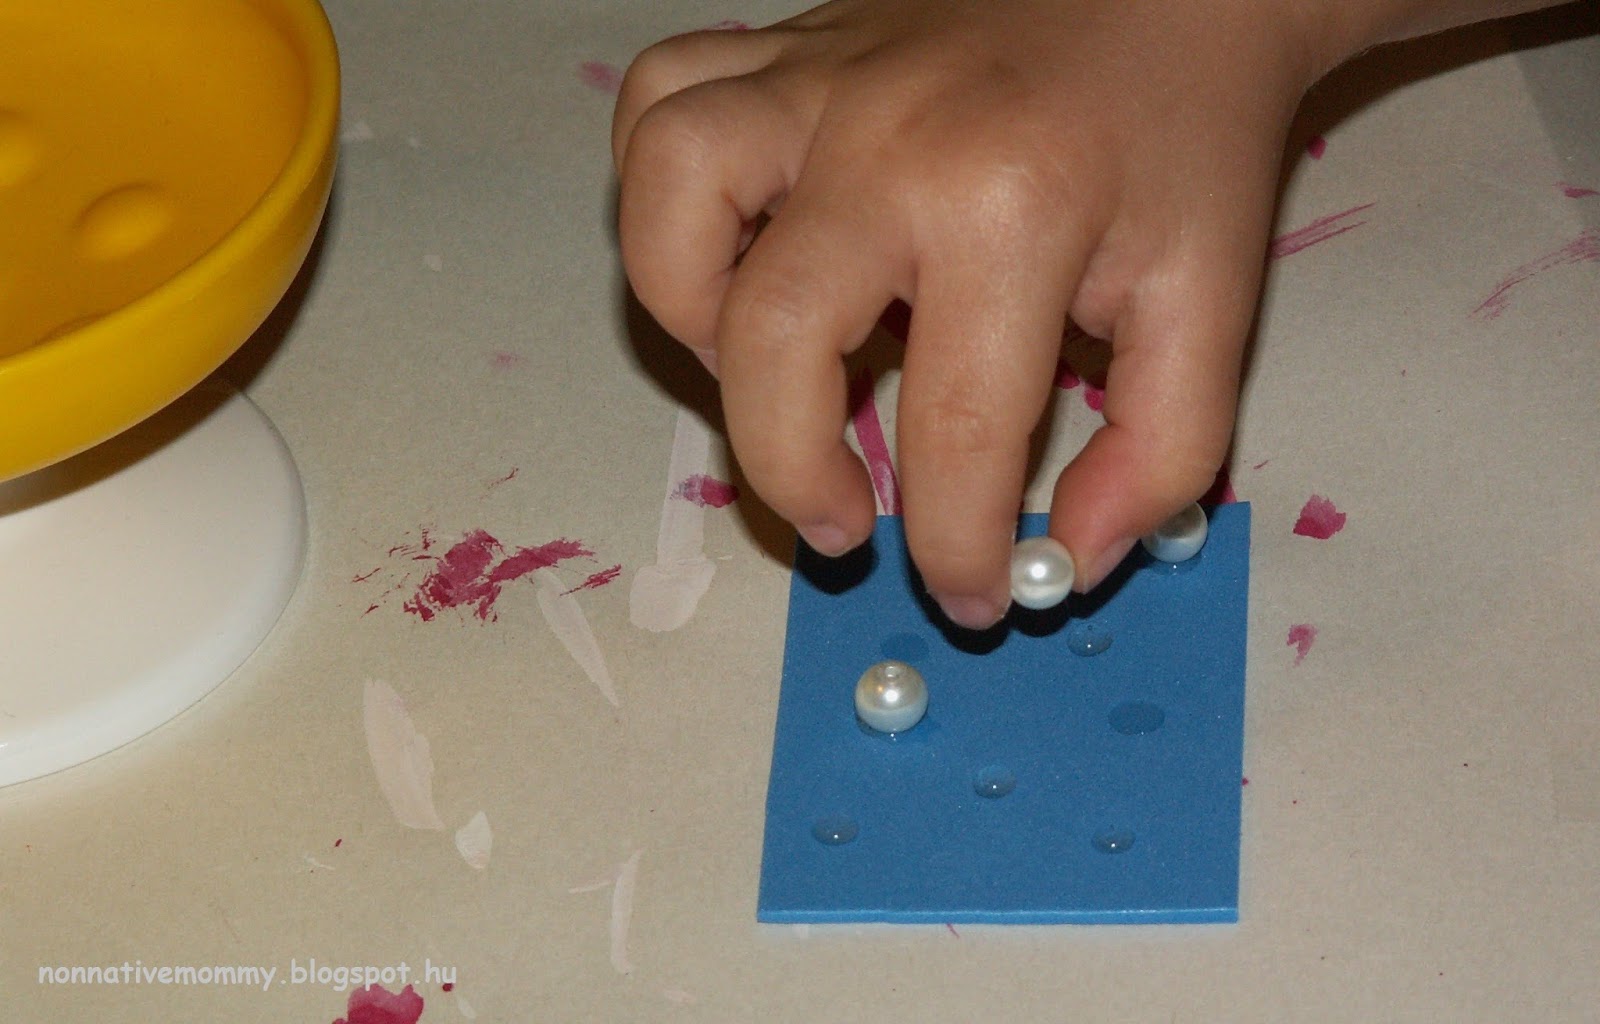
    spooning the red blood cells

    Red blood cells (red water beads) carry food and oxygen to the cells in our body.

    Adding the antibodies
    Spooning the white ones

    White blood cells (white water beads) fight off germs (viruses, bacteria).

    Plasma (water) makes it possible for the blood to move around our body.

    Of course, before she started I explained what is what. While she was pouring in the “ingredients” I was commenting what she was adding what their functions are in the blood.

  5. Optional: Add some more bowls for more spooning

It was never ending fun and still is. The beads lasts for weeks if you don’t forget to add some more water every now and them.

Few days ago I found the site where I first saw this idea:  I can teach my child – What is blood made of? They use ping-pong balls for white blood cells… What a great idea!

Sooooo nice to touch the beads

Look, Mommy! A virus!

Antibodies are stuck on the bacteria and burst them

Throughout the week I added some other tools to fish out the germs: tongs and tweezers:

Platelets (red foam rectangles) help to block a hole in your blood vessels when you have a cut. They do not let your blood out of your body.

E. has been playing so much with the blood sensory bin that we’ve had enough time to cover the blood-related vocabulary both in English and Hungarian. So here is a word list to help you if you decide to prepare this fun activity for your kid. If I’m in a good mood, I might make some flashcards in this field.

A weak 4th July

On the 4th July (Saturday) we couldn’t really celebrate. There were several reasons for it, but in short: we had been ill. The week before E.’d had some stomach bug which I seemed to catch as well. I had no time to prepare anything for the US celebration whatsoever. Not to mention the busy Saturday we had at a friend’s place (luckily we both got better by Saturday).

So my plan was to do at least ONE 4th July related activity out of the tons of great crafts and fun ideas I’ve collected on my pinterest board.

On Sunday morning (5th July) E. woke up with a sore throat. She felt all right in the morning so I thought the afternoon would be dedicated to a US flag craft out of popsicle sticks. After her  nap time she was weak. I asked her if she felt like doing some crafts and she got excited.

the beginning

We did try it, however, E.’s temperature was quickly climbing high and she kept saying: – Mommy, you do it. during the activity… Poor thing 😦 (Every 15 minutes she got Schüssler salt tablets and her immune system reacted very quickly.)

Finally we (I) managed to finish the flag, but it wasn’t much fun.
Afterwards, I put her to bed, gave her tea and read her some stories. She felt very poorly with high temperature by the end of the day.

Maybe next year we’ll be luckier and do some more 4th July related activities.

the final result

Just for your information:

– What you need for the  popsicle stick US flag:

  • 6-8 popsicle sticks (we have wide ones so we used 6)
  • red and white paint + paint brush + a little water
  • a small piece of blue foam sheet (I used leftover foam)
  • 10 white beads (each represents 10 states)
  • glue
  • cellotape
– How to make it:
E. wanted some glitter glue on the red ones
  1. paint 5 of the 6 popsicle sticks (3 red, 2 white) and let them dry
  2. cut our a rectangle shaped blue foam and stick the beads on
  3. when the coloured popsicle sticks have dried, turn them upside down in the right order (red, white, red, white, red) then put little glue on the edges and stick them together. I added some cello-tape on the back to make sure they’ll stay together.
  4. After a few minutes turn them back and stick on the pole and the blue foam with the beads.
  5. Let it dry – FINISHED

If you have a younger child (around 2), you should do the cutting and the sticking while your child is painting, but if your child is older you can also give him or her more responsibility, like cutting out the blue foam, pushing glue dabs on it and adding the beads. Still, you’ll need to do the final touch, the assembling.

What do we have to do with Australia? – Part 2.

Our Australian friends (who we’d met on our honeymoon in Istanbul) came to Europe for a cruise on the Danube. Their ship left from Budapest and they could visit us as well. They killed two birds with one stone and it was again a great opportunity for E. to “test” her English. (You can read about E.’s 1st real life test here when she met her English speaking cousin)

As soon as M. and B. arrived at our place, M. and E. hit it off. E. wanted to show her room and her kitchen and what she cooked. I was astonished to see it as she is never so open and welcoming to anyone, not to mention a stranger. There was no language barrier as such. It was absolutely natural for her to use English with M.

E. got some sweet presents (soft toys and books) from M. and B, which were all Australia related.

Presents for E. – Books

At first, she was a bit afraid of Jacko and the beanstalk (I guess because of the scary crocodile), but by now she’s okay with it.

She really loves to identify the Australian animals in the little booklet in the top right corner. As this book also includes the national anthem, we spent one evening after dinner to listen to it on youtube

(together with several other national anthems, like the British, the US, Irish, Spanish, Colombian and the German)

Toys E. received from M. and B.
Her favourite is the platypus (E. named her Platy). And we agreed they can talk in English only. She accepted it without any problem.

So our friends, M. and B., came to our place. I showed them around our area and invited them for a traditional Hungarian lunch (goulash soup, fried chicken breast in bread crumbs, mash potato plus green salad).

E. took a nap and as soon as she woke up we left for Szentendre, a town near to Budapest on the bank of the Danube.

Szentendre in pictures
Just arrived
Main Square

On the bank of the River Danube

We had a wonderful time together. E. proved her great level of English again. We’ve been enriched with some books on Australia, some stuffed animals from the country and the time spent with this lovely couple.

Thank you, M. and B.! We hope to see you again!

What do we have to do with AUSTRALIA??? Part 1

In short: Nothing. In more details: last month (April) we met a lovely elderly couple from Australia who we’d encountered on our honeymoon in Istanbul in 2011. Quite unusual.

I’ve taken  the opportunity of their visit to Hungary to introduce Australia to E. She loves planet Earth anyway. She already knows about continents (her favourite is Antarctica) so Australia will be fascinating for her. I hoped…

Map of Australia

As E. enjoys looking at maps and our big picture atlas I made a map colouring activity for her. I just printed a blank Australia map with the states drawn on it and after naming each states we coloured them one by one.

E. is practising her A
I also wrote AUSTRALIA below the map and E. traced my letters.

This Australian map puzzle was quite time-consuming to make but the result was beautiful and E. loved it. The link gives you a detailed description how to prepare it. In my version I laminated the pieces. As Queensland and Western Australia consist of 2 parts I sellotaped them together. Then I added sticky back velcro (bought them on sale in Auchan).

The background is a big blue cardboard


sticking


FINISHED!

I couldn’t buy a big enough cardboard to fit Tasmania in the right place. What a pity!

We can also use this puzzle map in the long run (I also plan to introduce her some cities as well as animals and famous sights. We’ll use this map to pin cities, animals and sights up on it and put it on the wall to display)

She has done the Australian puzzle map several occasions. Sometimes she even said the names of its states.

Painting the flag

As the puzzle map gave me a hard time we did not twist the flag project. I printed a blank Australian flag and painted it while we were talking about what is what on the flag
  1. The British Union Jack flag is in the upper left corner – noting Australia’s ties to Great Britain
  2. The Southern Cross constellation (5 stars) is on the right side of the flag. The constellation can be seen from everywhere in Australia
  3. The large, white, seven-pointed Commonwealth Star

Of course, we displayed our pieces  on our living-room door. You need to imaging the composition as I’ve forgotten to take a photo of it.

Work in progress
Let’s start!

Animals of Australia

First, I created flashcards of the most commonly known Australian animals. (See a printable at the end of the post)

Kangaroo                                         Duck-billed Platypus
Koala                                                Cassowary
Emu                                                  Brown snake
Wombat                                           Salt Water Crocodile
Dingo                                                Echidna
Tasmanian Devil                           Frilled Necked Lizard

E. has already heard about and seen a kangaroo in the zoo, and also seen pictures of koalas. She knows the (white) wombat from the video titled Red Rabbit, Green Gorilla. She is also familiar with the look of a crocodile or a snake as well as an ostrich, which can remind you of an emu. So first, I showed her 7 flashcards out of the 12.

As most of the animals had a familiar look I decided to add some information to the flashcards on their backs.

We had a look at Australia in our Picture Atlas Of The World.

As on this map flora and fauna is depicted, I showed E. an animal, I said its name and  she needed to find it on the map. When she found it we placed the flashcard on the map and I told her some interesting information (1 or 2 pieces) about the animal (eating habit, place of living, offspring etc.)
She was laughing at the platypus and found the Tasmanian Devil cute.

When we finished with this she wanted to see them in real life so we sat down in front of youtube and watched a few interesting videos. (I had prepared for this request so we didn’t need to waste time with searching for them)

The Cow Goes Moo – Kangaroo for Kids

Koala-la-la-la

Bindi and Robert Irwin feature huge salt-water crocodile

Platypus: Animals for Children

E. was fascinated by the platypus, mainly its webbed feet. So we needed to draw a Mommy and Baby platypus webbed “feet”

We’ll have a look at the other animals later.

In the next part:

E.’s 2nd test of her English; the lovely time in Szentendre we spent together with our Australian friends (M. and B.). – You can read about E.’s 1st real life test here
E. got some sweet presents (soft toys and books) from M. and B.


Colour changing flower experiment

As a part of our flower project in spring we also dealt with a little science. More precisely, how flowers absorb water through their stems reaching the petals. This colour changing carnation experiment gave me the idea, but there were some glitch in the matrix and we needed to do it twice. Let’s see how.

The flower experiment idea is great, however, we did something wrong or were just unlucky this time.

First of all, what you need to the project:

  • 4-5 white flowers of any kind (chrysanthemum didn’t work very well, carnations were better)
  • food colouring (4-5 colours, or you can mix them)
  • transparent glasses or viols
  • water
  • measuring cup
  • spoon
  • towel for spills
  • scissors
How to do it:
  • prepare everything on a tray for you child and she/he can do all the activities
  • add water to the glasses/viols
  • add the food colouring and mix them with a spoon
  • cut the stem of the flowers (10-15 cms long)
  • make the flowers stand in the glasses/vases

  • wait… minimum 1 or 2 days
In case of the carnations the colouring of the petals could have be seen the next day,
but in the first trial the chrysanthemum took 3 and a half days to show any signs of pigmentation.

While E was preparing (pouring water, cutting stems, mixing colours) the experiment I asked her what she thinks will happen. She didn’t have a clue.

– I don’t know Mommy, You say.

Then I explained what the coloured water will do:
– The stem will suck up the water, like you suck it up through a straw. (Then she imitated sucking 🙂 )
– The coloured water will be absorbed. (she was digesting the new word)
– The water will reach the petals and they will turn red (I pointed at the flower standing in red water), green (I pointed at the flower standing in green water), blue (I pointed at the flower standing in blue water) and yellow (I pointed at the flower standing in yellow water).

In the first round after a week the chrysanthemums started to wilt so we could not observe any more colours on the petals.

In the second round of the experiment, while I was cleaning, I put the carnations on the floor light-mindedly. Then E. accidentally kicked them over. So after 5 days our second flower experiment was over.  Anyways, we could see the pigmentation of the petals somehow.

She enjoyed preparing the experiment more than the result. Who could blame her after all…?

Let me know if you try this experiment and have better results, let’s say, after 10-12 days.