Holy Week Calendar

I’ve been waiting for the time when my daughters are big enough to learn about the real meaning of Easter. It’s not all bunnies and chocolate eggs, and I really wanted them to feel the importance of this special holidays.

I found this great holy week calendar on pinterest and I was determined to do it with E. (and if Little L wanted to join in she could too. Not surprisingly she did want to join in)

From Palm Sunday until Resurrection Sunday every day we made a little craft activity and read from the bible (both in English and in Hungarian).

20200405_145313

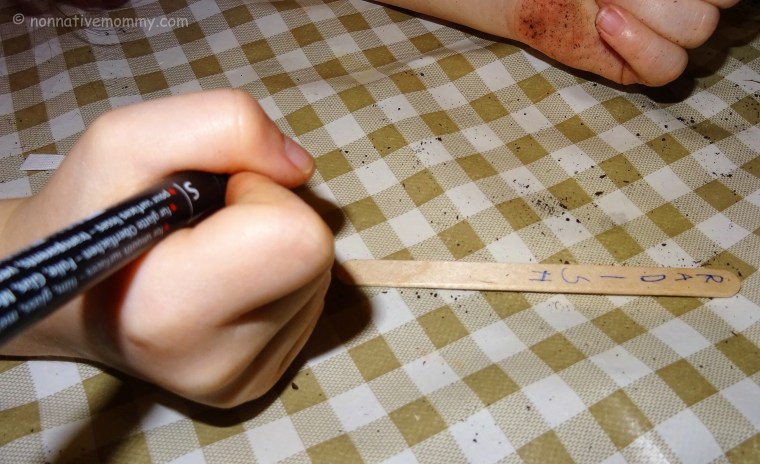
We started with cutting up 4 pieces of coloured paper (yellow) and E wrote the days on other coloured stips with her beautiful cursive writing.

20200405_142059

While she was writing I was jotting down some biblical quotes that I found on the Domestic Notebook blog.

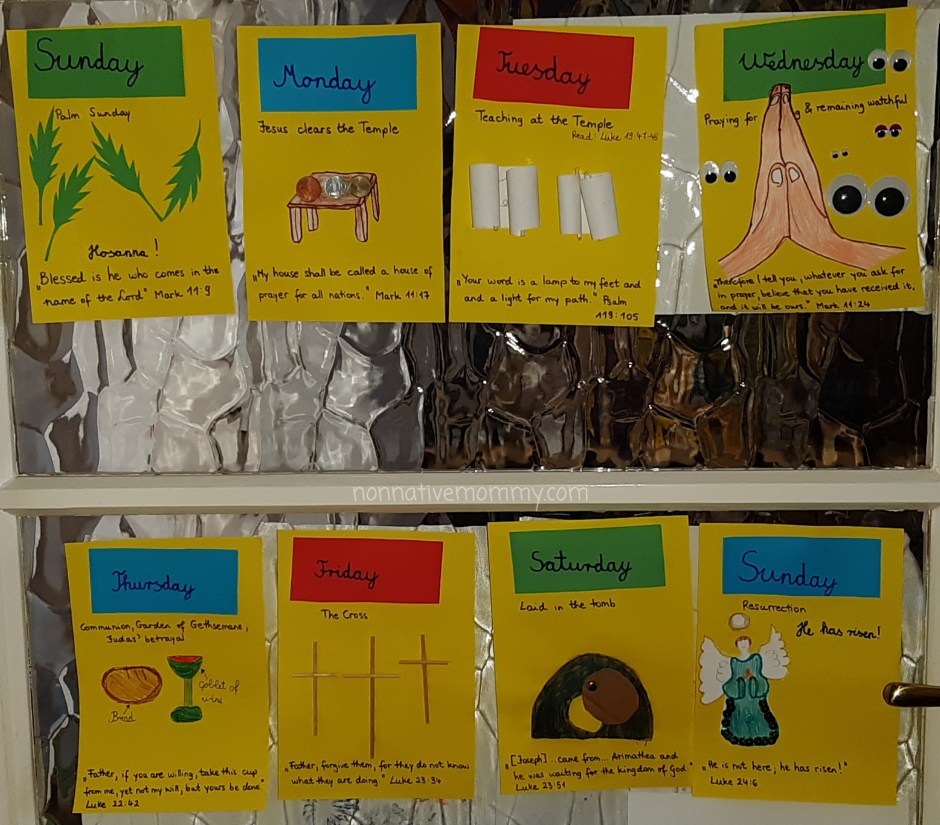
The next has been copied from the Domestic Notebook blog as we followed it day by day. The pictures attached are our handiwork

Sunday
TOPIC: Palm Sunday
READING: Mark 11:1-11 and Luke 19:28-44
CRAFT: construction paper palm leaves
MEMORY VERSE: “Hosanna! Blessed is he who comes in the name of the Lord!” Mark 11:9
SONGS: “Hosanna!” by Hillsong, “Hosanna! {Blessed is He Who Comes in the Name of the Lord}” by Michael W. Smith


We made palm leaves. I prepared some green paper and popsicle sticks. I traced the kids hand and they cut them out (I folded the paper 3 times so we needed to cut only 2 for left and right hands).


When finished with the cutting we stuck the hands around the popsicle stick, which formed a palm leaf. Out of the leftover green paper I cut out small palm leaves and E. stuck them on the yellow sheet.
Monday
TOPIC: Jesus Clears the Temple
READING: Mark 11:12-17
CRAFT: construction paper table cut-out with pennies taped on top
MEMORY VERSE: “My house shall be called a house of prayer for all nations.” Mark 11:17/Isaiah 56:7

We did exactly as it was suggested. First, we always read the biblical line and then made the craft based on what we’d read. After sticking the table and some foreign coins on it. E. had a great idea that we should have placed the table upside down and the coins on the floor as Jesus knocked them over.

20200406_143431
Tuesday
TOPIC: Teaching at the Temple
READING: Luke 19:47-48
CRAFT: scrolls made out of paper and two sticks
MEMORY VERSE: “Your word is a lamp to my feet and a light for my path.” Psalm 119:105
SONG: “Thy Word” by Amy Grant

We made the scrolls with the help of the skewers again. The kids cut a small piece of white paper and scribbled some gibberish on it. Or that’s what I thought. E. wrote her name on it as well. Little L. wrote her kindergarten friend’s name on it who she misses a lot due to the lockdown.

20200407_155906

Wednesday
TOPIC: Praying for Anything and Remaining Watchful
READING: Mark 11: 20-26, 13:32-37 and Luke 21:34-36
CRAFT: trace child’s hands to represent praying hands; watchtower or eye to represent remaining watchful
MEMORY VERSE: “Therefore I tell you, whatever you ask for in prayer, believe that you have received it, and it will be ours.” Mark 11:24

E.’s favourite day because of the watchful googly eyes she could stick all over the page. We overdrew her praying hands. We contemplated that next time Little L’s hands need to be overdrawn as E.’s had grown a lot and hardly fitted on the page.


Thursday
TOPIC: Communion, Garden of Gethsemane, Judas’ Betrayal
READING: Mark 14:17-26, 32-35, 43-50 and Luke 22:14-23, 39-53
CRAFT: saltine cracker and construction paper cutout of goblet; sack of coins
MEMORY VERSE: “Father, if you are willing, take this cup from me, yet not my will, but yours be done.” Luke 22:42

There are so many things to talk about concerning this day. We chose the last supper as it is the most understandable part of all the happenings. Therefore E. drew a loaf of bread and a goblet.

20200409_142413

Friday
TOPIC: The Cross
READING: Mark 15:16-39 and Luke 23:26-49
CRAFT: 3 popsicle stick crosses
MEMORY VERSE: “Father, forgive them, for they do not know what they are doing.” Luke 23:34
SONG: “When I Survey The Wondrous Cross” by

Instead of popsicle sticks we used simple skewers to make 3 crosses. Popsicle sticks would have been easier to glue together.

20200410_150407

Saturday
TOPIC: Laid in the Tomb
READING: Mark 15:42-47 and Luke 23:50-56
CRAFT: construction paper tomb and stone
MEMORY VERSE: “[Joseph] came from…Arimathea and he was waiting for the kingdom of God.” Luke 23:51

We made the tomb a little interactive. E. drew the tomb on cardboard. I helped her cut out the hole in the middle. A bigger circle was cut out too and fixed it on the hole with round-headed paper fastener (=jancsiszeg). You can move the big boulder to peep inside.
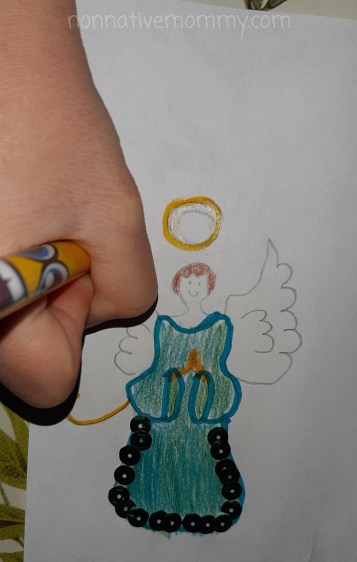
 

Resurrection Sunday
TOPIC: Resurrection
READING: Luke 24:1-12
CRAFT: folded linen cloth and a picture of an angel
MEMORY VERSE: “He is not here; he has risen!” Luke 24:6
SONG: “He Lives!” {lyrics by Alfred Ackley}; “Christ is Risen” by Matt Maher

E. copied an angel from the net and decorated it with sequins. She wrote He has risen. next to him. We left a little place for L’s angel.

20200412_142550

Parallel with the crafts and reading the Bible, E. also played with a biblical app that I downloaded to my phone from bible.com .

bible app

Here is the result.

20200412_153925

The whole project doesn’t need much daily preparation, and it has turned out beautifully. The kids seem to understand the basics of the Easter holiday. I’m sure we’re going to this next year as well.

Blessed Easter!


Paper plate growing flower

Flowers are blooming in our garden, but the weather turned cold, so we brought spring inside our home with this paper plate growing flower craft.

spring2020 (1)

To be honest, I needed to find some craft project for E. as she needed to hand in some spring related craft for school.

I found this cute paper plate growing flower craft on pinterest. (Check out the link for the original idea.) I thought this will go well with our spring playlist on youtube.

While we were listening to the spring songs our hands were busy with doing  the craft.

What you need:

  • paper plate
  • paint
  • yellow/white/green construction paper
  • popsicle stick/spatula
  • markers/coloured pencils
  • glue
  • scissors
  • yellow button or bead

How we made it:

To begin with, I advise you to prepare the smaller and more time-consuming elements of the craft, like the leaves, or drawing of the little girls who is watering the flower, with smaller kids even the flower petals.

We started with the painting of the ground brown in the lower section of the paper plate. 20200328_093158

Then we let it dry. While it was drying we made the flowers. You can paint the petals with fingertips, but my daughters don’t like to get dirty, so we used dot markers instead. We let them dry as well.

We cut out the green leaves, and coloured and cut the little girl out. (I drew the girl, the kids just coloured it. In case of older kids 10+ you can let them draw their own.)

20200328_094721

When everything dried we drew the roots with a black marker, cut the sun and paste it on the paper plate. The kids drew the rays of the sun.

20200328_094757

When the petals of our flowers were dry we glued the yellow button on as the pistil.

After that we glued the leaves on the popsicle stick (lucky I had green sticks), then the flower head. The girls also glued the little girl on the paper plate. I did the cutting along the ground line with a sharp hobby knife.

20200328_101557

When everything was ready they tried to put the flower through the hole but it always stuck because of the leaves. I folded the middle of the paper plate and problem was solved.

20200328_101615

While playing they were singing (to the tune of Head, shoulders, knees and toes):

Flower, stem, leaves and roots, leaves and roots
And all it takes is sun and showers
And the seed grows into a flower.

Check the song on youtube.


Muffin tray nature hunt reloaded

Our garden has come to life again. The birdfeeder is full of songbirds, our golden chain bush stated to bloom. Our daffodils’ buds are starting to open. The sun is shining bright. The best time to be amazed by the awakening of nature. So I printed and cut and set our muffin tray in motion.

This is not a new activity as we did it with E. and our British nanny, A. 5 (!!! OMG) years ago. You can find the Tray Nature Hunt among the posts (or by clicking on the link)

I grabbed our 12-hole muffin tray and looked around the garden. I put together a 12-image sheet with things the kids can find in our garden. I cut the pictures out and placed them in the holes of the muffin tray.

20200320_162705

We had a look at the pictures together with the kids and identified what they needed to collect. E. could read the words under the pics and she helped Little L. (we do not own a colour printer unfortunately, so I tried to make the pictures more understandable with a little colouring).

At the beginning we discussed what to collect. (watch a video of it on the link) You can hear that I warned them not to pick the daffodils, but 2 or 3 of the golden chain’s tiny flowers.

Then they ran away. They were collecting soil from the front garden, stones from behind the shed. Little L. found some fluffy dove feathers and E. was crawling on all her fours to find a bug.

Finally, she managed to get an ant, which I accepted as a “bug”.

L. slid under the bush and pine tree to get the cone; E. took a rake from the shed to pull it out.

20200320_163954

They were running around for 20 minutes or so to gather everything.

Afterwards we came together again and checked the treasures of nature.

20200320_165742

To finish with, they joined the cat in his legless pose. 🙂

20200320_165556


Everybody sing the planting song

Every year we plant flowers on our balcony with E. who loves spring and the revival of nature (and her coming birthday too).

Usually I buy some plants at the flower market and we plant them together, like last year or the year before. Last year we also tried to plant carrots, tomatoes, and ruccola. Well, apart from the tomato it wasn’t a successful year (we had 8-10 cherry tomatoes in September), but we’d started plating really late, at the beginning of May.

To attune the girls to the revival of nature and planting I collected some youtube videos for them, mainly songs. Here are their favourite ones (that they learnt by heart within 2 days):

The Planting Song

Parts of a plant

One seed

How plants grow

Peppa pig-Gardening

However, this year I was all prepared. I bought these cute plant nurseries at the Flying Tiger Shop and some seeds in one of the big supermarkets. (We collected some seeds from our balcony flowers, too, 2 years ago and I accidentally found the envelopes.) One of the ladies at the market who I get on really well with gave some spring onion bulbs to E. to plant.

We had a 4-day long weekend due to our national holiday, 15 March and we used one of the days to do the planting.

DSC01413

I put down and old wax table cloth on the floor and fixed it with painter’s tape. Then prepared all the necessary ingredients:

  • dirt (in another word soil)
  • seeds (this year we planted radishes, gurkins*, carrots, basil, tomato, poppies, and snapdragons.)
  • spoons (next year a really need to purchase some kid-size gardening tools)
  • plant nursery

Before starting the planting procedure I showed them the parts of a flower cards and they put them in the right order: root, stem, leaves and flower. E. placed the word cards next to them. (The link above will take you to the site where you can download your own copy if you wish.)

The girls scooped the dirt in the little holes. L. was making the sound of a digger while doing it. And for her that was it all. She lost interest in planting very quickly. She went to her little kitchen and cooked some food for Daddy.

DSC01420

But E. was really enthusiastic about it. She told me which seed to plant first , she opened the packets and envelopes that hid the seeds. She observed the seeds carefully noticing their different shapes, sizes and colours. (It was quite fascinating to see that the tomato seeds were blue and the poppy seeds were really tiny.)

She also wrote the name of the plants on a wooden stick so we’ll know later on which sprout is which plant.

DSC01422

E. made holes in the dirt with her index finger and dropped the seeds, next covered them with some more dirt. When we finished with all of them she watered them lightly.

DSC01454

E. enjoyed it some much and was so excited about the planting that she was staring at the plant nursery nearly all afternoon. She was talking to them and wanted to water them more. This gave us an opportunity to talk about that giving the plant too much water or sunshine does no good.

The next day our radish and gurkin sprouted and E. saw a gurkin loop in the dirt. She started to call them Loopy and ran to find her Ikea plush gurkin/cucumber.

After a few days I offered her to draw what happens to the plant in a plant diary. She wanted to draw only the radish and the gurkin although every seed had started to sprout by this time. She measured them and drew how they changed size and colour, how they grew.

This slideshow requires JavaScript.

The next phase was to put them into bigger pots. Unfortunately we waited too long and planted the seeds too close to each other so we had a hard time to separate them. It might happen that they won’t survive as both the roots and the stems were rather weak. The radishes went to the balcony in a long pot, the gurkins were planted into bigger round pots with 2 wooden sticks and a string between them to provide support for the future vines.

Still E. is talking to them kindly and taking care of them with great care. Whoever comes to us has to have a look at the plants. Her plant diary is coming along really nicely. Soon we need to replace the other plants into bigger pots (we ran out of soil).

Stay tuned, there’s more to come, hopefully you can see beautiful flowers and tasty veggies.

*I found 2 ways of writing gurkin/gherkin. The latter is more common but I used the first version in this post. When I asked E. if she could spell it, she spellt it gurkin 🙂

Welcome back, storks

The first stork came back from Africa on March 3 this year (2017). I showed pictures of him in his nest (his name is Báró) to E.

golyabaro-800x800

E. got excited. For quite a while she hasn’t been excited about anything but water animals therefore I myself got excited too.

I quickly looked up a stork craft online and found this cute and easy-to-make paper napkin storks. We watch the how-to-make video together with E. Of course, to make the stork was too difficult for her, so I made them.

PICT0012_JPG

What she did was the decoration. We did the whole craft in 2 goes. First, we made Báró. E. took him to bed, she even drew pillows for him. Not to mention that he was hurt during the flight (E.’s imagination is unlimited, in real the stork had no problem whatsoever) so she drew some medicine bottles too.

Báró is in progress:

She asked me to make some more storks. She wanted to give some to the Grandmas whose birthday and name-day were coming.

Then I made some more and she decorated some more. First, colouring them with markers:

PICT0021_JPG

Then adding water onto the napkin:

PICT0017_JPG

We talked a lot about bird migration: why they fly away and how they can fly so much. We also looked at a map where one can see the flying routs of individual storks. Some bird related vocabulary like feathers, beak, wings, nest, fly, flight were revised as well.

Spring has arrived with our storks.

PICT0018_JPG